Isn't he cute? Want to know how to make him? I'll do my best to show you....Scroll on down.
I started with a 7cm by 7cm square of Real Red card stock and a quarter of a sheet of Whisper White A4 which I had run through the Big Shot using the Polka Dot TEF.
Then I gathered these punches: the Ornament Punch, the Bird Builder Punch, the 4.4 cm Circle Punch, the Extra-Large Oval Punch, and a school punch (I think everyone has one of these to punch holes for ring binders). Also used, but not in the photo was the 1.3 cm cirlce punch.
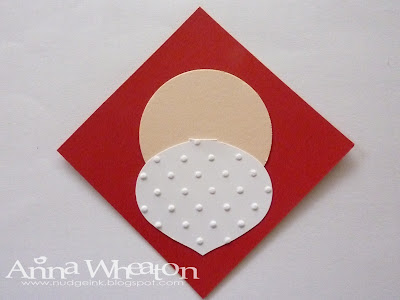
First punch a 4.4 cm circle out of a light coloured card (I used Blush Blossom, but it is now retired). Snail this onto your Real Red cardstock, slightly higher than halfway.
Punch an Ornament Punch from your Polka Dot Whisper White and snip off the top. Snail this (gently, so you don't squash the dots) onto your circle. (I've left the top of the ornament there to show you what to snip.)
So you'll end up with this.
Using the Bird Builder Punch, punch out one wing from your Polka Dots then turn the card stock over to punch another wing.
One wing with the cardstock this way (bumps upwards)...
And then one with the cardstock this way (bumps downwards)
These are your two moustache pieces. A dimensional will fit on the back of each one to give the face a bit of depth. The nose is out with the 1.3 cm Circle Punch (which I left out of my punch picture!) It's also attached with a dimensional...because noses stick out a little don't they? His eyes are punched out of Basic Black using a school/binder punch and stuck on with a 2-Way Glue Pen.
His hat is made using the Extra Large Oval. First, punch and take a chunk out of your Whisper White Polka Dots.
You don't need the bit you just punched out but you need the curve it has left behind.
Move your punch up to take a 'bite' out, so that you have a piece with two curved edges. Don't make it too skinny- Santa's hat need to be warm and woolly.
Punch out a pom pom from the Whisper White Polka Dot, using the 1.3 cm circle punch. Attach the hat and the pom pom to your tag, again using dimensionals. I find it looks best if your pom pom is attached to meet the pointy part at the side of the hat.
So there he is. If you don't have the exact punches experiment a bit with the shapes that you do have.
We made a whole lot of different tags in the class and learnt a few new ideas. If you are interested in coming along to my classes, they are held twice a month in my home in the Burleigh Waters area. Email me at wheatonanna@hotmail.com or phone 55 765 469.
Thanks for stopping by!
Anna


No comments:
Post a Comment